
Affordable Cloud Hosting with Hetzner CX Series: Automating Deployments Using Kamal and GitHub Actions
Disclaimer
This article is not for “tech-savvy” individuals afraid of getting their hands-on managing servers themselves.
What
Hetzner’s recent launch of their CX series cloud computing instances with Intel vCPUs that offers incredibly affordable cloud computing options, perfect for those willing to get hands-on and not afraid to dive into the technical details. It made me reevaluate the current setup for Hemmelig.app. Previously, Hemmelig were using a Linode nanode server, and Ansible for deployments. No CI/CD. However, I felt that the existing stack had become not easy to use, and wanted to change the setup.
Let’s talk Hetzner
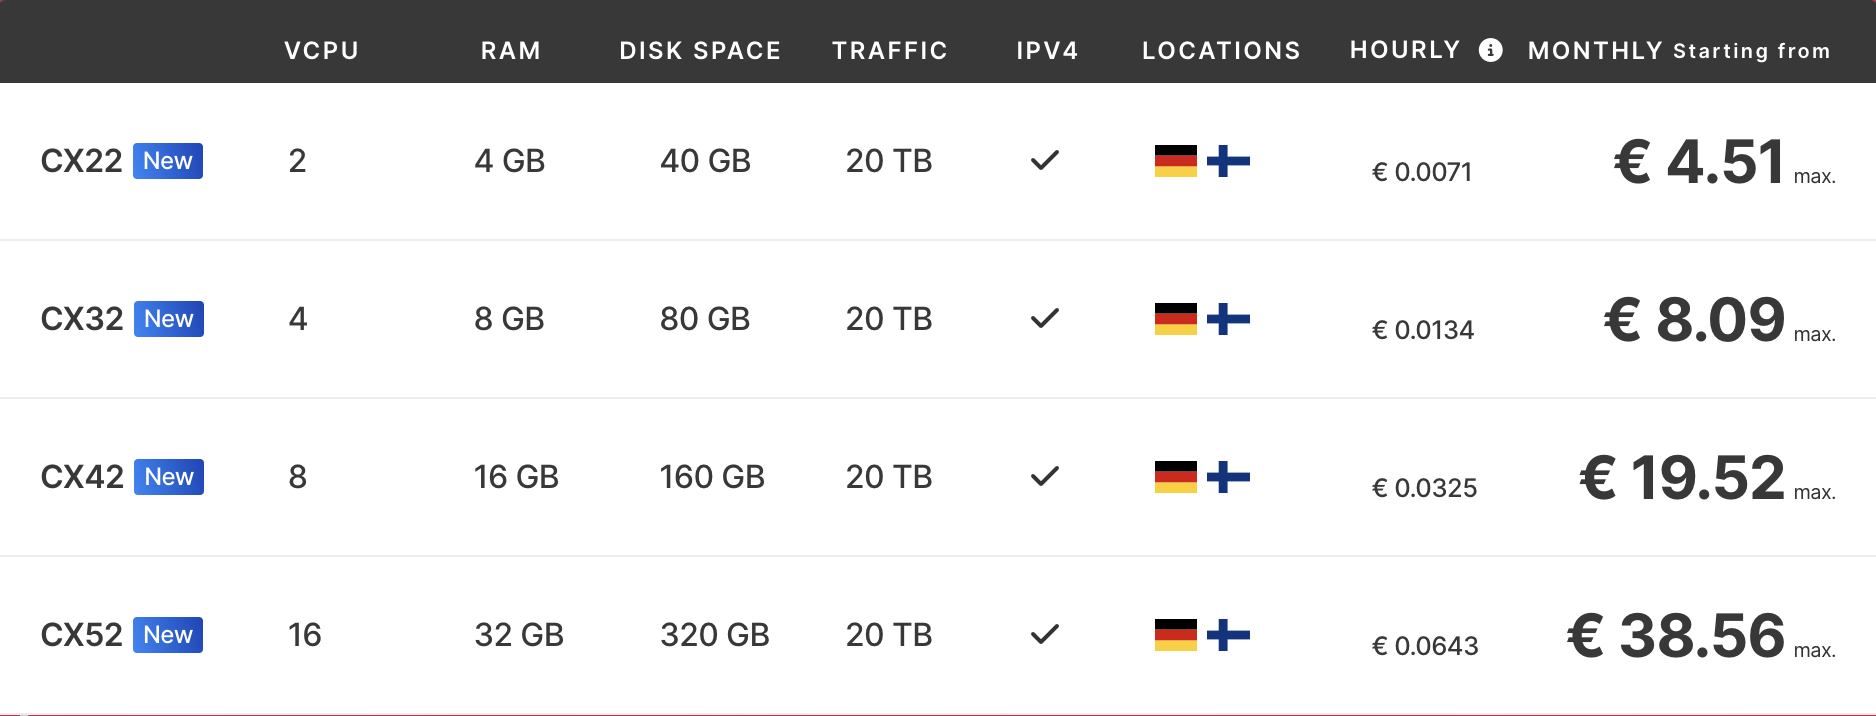
I opted for the CX32 instance since I required more computing power than the previous Nanode 1GB 1 vCPU 25GB storage priced at $5 excluding VAT. If you look at the image, you can see Hetzner’s pricing model. These prices include VAT.
After getting the server up and running with my SSH keys, I attached a firewall to it with these inbound rules:
- Any → TCP → Port 22
- Cloudflare IPs → TCP → Port 80,443
As you can see it is restricted to the HTTP(s) traffic the Cloudflare global network to mask the IP address from the world as Hemmelig.app is using CloudFlare. Here are the IPV4 and IPV6 lists.
What about Cloudflare
Cloudflare is a web performance and security company that provides a global cloud platform that delivers a range of network services to businesses around the world.
Some of what Cloudflare provides being used
- DDoS Protection: Their network can detect and mitigate distributed denial-of-service (DDoS) attacks by filtering out malicious traffic before it reaches the origin server
- SSL/TLS Encryption: Cloudflare provides free SSL/TLS certificates and seamless end-to-end encryption to secure website traffic.
- Domain Name Services (DNS)
Hemmelig.app was already pointing to the Cloudflare nameservers, so all that had to be done here was to update the A record to the new IP. The proxy setup is used to leverage caching, DDoS protection, and SSL/TLS Encryption by default from Cloudflare. More about proxied dns records.

The visitor flow going through the Cloudflare DNS proxy.
How to deploy the application
Here comes Kamal Deploy to a rescue, deploy apps anywhere, from bare metal to cloud VMs.
Kamal offers zero-downtime deploys, rolling restarts, asset bridging, remote builds, accessory service management, and everything else you need to deploy and manage your web app in production with Docker.
If we look back 10-14 years ago, we were using Capistrano, a Ruby-based deployment tool. Capistrano had a workflow file where we defined all the necessary steps before shipping a tar file to our server and unpacking it into a folder served by Apache.
For Hemmelig, I was seeking the same simplified approach, but for docker. While browsing X, I stumbled upon a post by DHH about the launch of Kamal, which caught my interest. After reading about it, Kamal seems like a tool well-suited for applications like Hemmelig, offering the simplicity I was looking for.
Here goes the setup:
$ kamal init
The config/deploy.yml file
# Name of your application. Used to uniquely configure containers.
service: hemmelig_app

# Name of the container image.
image: hemmeligapp/hemmelig

# It is possible to user other registries as well
registry:
  username:
    - DOCKER_USERNAME
  password:
    - DOCKER_PASSWORD

# Use a different ssh user than root
# ssh:
#   user: nonroot

# Deploy to these servers.
servers:
  - <replace_me_with_the_server_ip>

# These volumes are needed for
# 1. User data (encrypted json files)
# 2. The database folder for sqlite
volumes:
  - "/root/hemmelig/userdata/:/var/tmp/hemmelig/upload/files"
  - "/root/hemmelig/database/:/home/node/hemmelig/database/"

# Inject ENV variables into containers (secrets come from .env).
# Or in my case the secrets comes from secret env vars set by
# Github Environments
# Remember to run `kamal env push` after making changes!
env:
  clear:
    SECRET_ROOT_USER: "bjarneo"
    SECRET_ROOT_PASSWORD: "lolyouthinkthisisit"
    SECRET_ROOT_EMAIL: "hemmeligapp@gmail.com"
    SECRET_MAX_TEXT_SIZE: "20048"
    SECRET_HOST: "hemmelig.app"
  secret:
    - SECRET_MASTER_KEY
    - SECRET_JWT_SECRET

# Configure custom arguments for Traefik.
# Be sure to reboot traefik when you modify it.
traefik:
  args:
    accesslog: true
    accesslog.format: json

# Configure a health check
# Important note if you use this approach is that the
# docker image has to contain curl, if not it will fail.
healthcheck:
  path: /api/healthz
  port: 3000
  interval: 10s

# https://kamal-deploy.org/docs/configuration/ssh-connection-management/
sshkit:
  max_concurrent_starts: 10
  pool_idle_timeout: 200
# Setup will ssh to your server and install dependencies needed
# Including docker and curl
$ kamal setup

# Run this command to deploy (setup will handle this the first time)
$ kamal deploy
Streamline and automation
Manual deploys of local code can be a recipe for disaster in production. Let’s streamline and automate this process by deploying directly from the main branch on GitHub whenever new code is committed using Github Actions.
Create a file in this directory <repo>/.github/workflows/deploy.yaml
name: Deploy instance
on:
    push:
        branches:
            - main

jobs::
    # This is the job deploying the application to your
	# newly created server
    deploy:
		# All existing tools for this runner https://github.com/actions/runner-images/blob/main/images/ubuntu/Ubuntu2404-Readme.md
        runs-on: ubuntu-latest
        timeout-minutes: 15

        # Let us come back to this environment later on
        environment: production
        steps:
		    # This will checkout the repository so you have your code
		    # in the github action runner
            - name: Checkout Code
              uses: actions/checkout@v4

			# No explanation needed
            - name: Install Kamal
              run: gem install kamal

            # Start the ssh agent, let us come back to what this is later
            - name: Start SSH Agent
              uses: webfactory/ssh-agent@v0.9.0
              with:
                  ssh-private-key: ${{ secrets.SSH_PRIVATE_KEY }}

            - name: Setup Docker Buildx
              uses: docker/setup-buildx-action@v3

            # Secrets coming from the environment secrets
            - name: Log in to Docker Hub
              uses: docker/login-action@v3
              with:
                  username: ${{ secrets.DOCKER_USERNAME }}
                  password: ${{ secrets.DOCKER_PASSWORD }}

            - name: Release the kamal lock
              run: kamal lock release

            - name: Deploy
              run: kamal redeploy
By adding this file, and committing it to your main branch, it will start the deploy process. However, this will fail as we need to define our environment for the repository. In this case, it is called production.
The location for the environment is found here: https://github.com/<username>/<repository_name>/settings/environments
Github environment
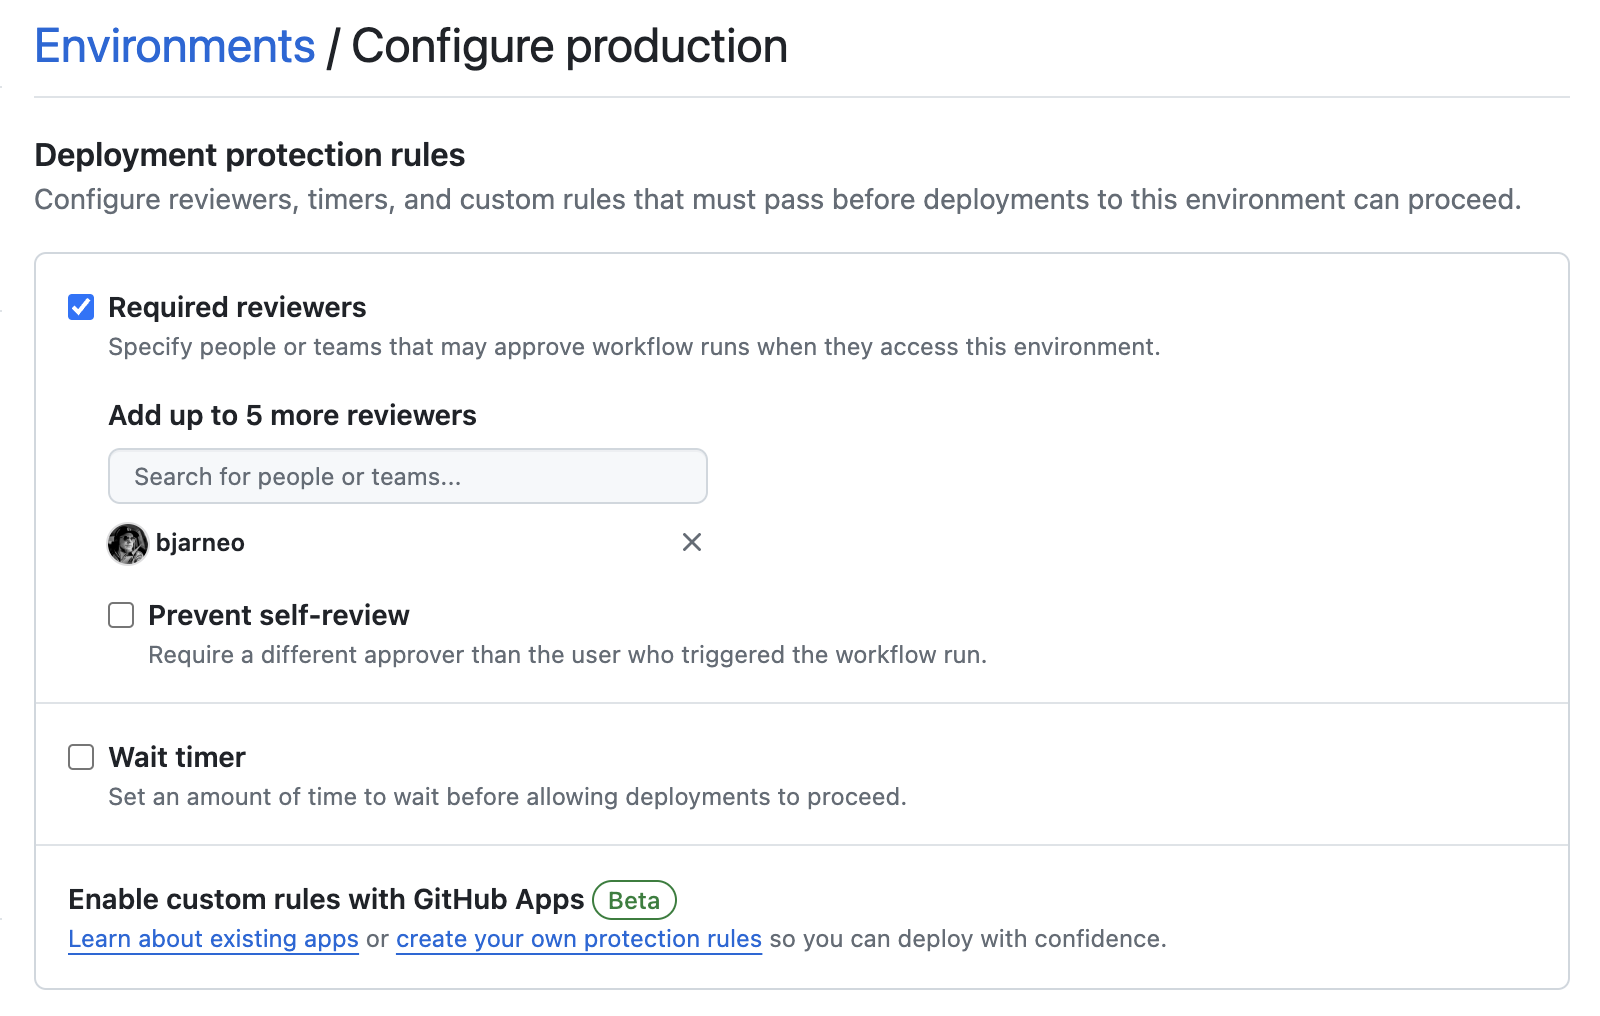
Steps to create a production environment:
- New environment
- Write the name
production - Check the required reviewers and add those allowed to deploy the app
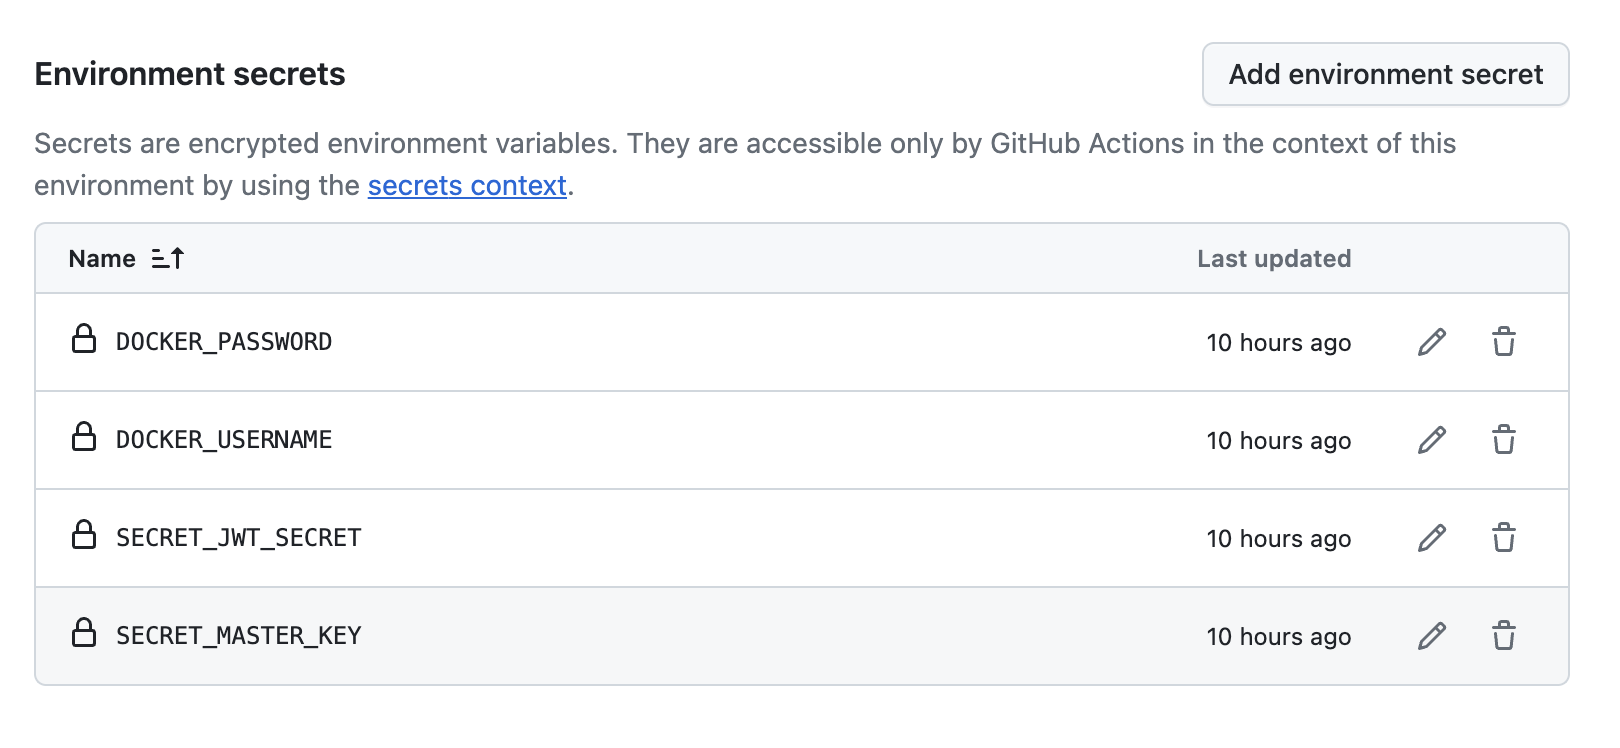
- If you scroll down you can see environment secrets. Add the secrets needed by both the kamal config and the deploy workflow:
- DOCKER_PASSWORD
- DOCKER_USERNAME
- SSH_PRIVATE_KEY (this can be added to the repo secrets, or org secrets as well, depends on your use case)
- ANOTHER_SECRET
SSH private & public key
To deploy to our server, we’ll first need to establish a connection. As highlighted in the Kamal step, this will require SSH access.
SSH keys are a secure way to log into remote Linux systems without passwords. Each key pair includes a public key shared with the server and a private key kept secret. The server verifies your identity using the keys, ensuring secure access.
Let us start creating the private and public key pair
$ ssh-keygen -t rsa -b 4096
# Enter file in which to save the key (/Users/dothash/.ssh/id_rsa): /Users/dothash/.ssh/github_hetzner
# Do not use a password in this case

# When this is done, copy the private key, MacOS example
$ cat ~/.ssh/github_hetzner | pbcopy
# Paste this private key to the Github environment secret key called
# SSH_PRIVATE_KEY

# The step needed is the public key you have to add to
# the hetzner server to the authorized keys

# Copy the public key
$ cat ~/.ssh/github_hetzner.pub | pbcopy
$ ssh root@<ip_to_hetzner>
# Paste the public key to a newline here
$ vim ~/.ssh/authorized_keys
Catch you later
After these steps you are able to start your deployment to Hetzner from Github Actions where you have to approve the deployment from the Github Environment.
Recap
- Setup your Hetzner server
- Optional, use Cloudflare to route the traffic
- Create your Kamal deploy config
- Feel free to test it before adding it to Github
- Create the Github workflow
If any questions, feel free to reach out to me on X, @iamdothash.
“It DoEsNt ScAlE”
I see this all the time. The important part before you scale is that you actually need users. A lot of users. It rarely happens that your app will explode overnight such as this case. But how do you scale without using serverless? Let us dig into that in an upcoming article.